2024-12-17 06:02:38|Myriagame |source:minecraft skins
This page introduces the method of making the map, and the way it follows the player's movement in the world automatically, as well as the limitations of the map and the potential trap.
There are two different ways when creating the icon: one is to walk to the edge of the current map before creating a new map.The other is to carefully ensure the overlap of the map. In this way, finding the same goals on multiple maps will be easy, and the relative relationship between maps can be known.
The map zoom function is added to the game after the appalling update (Java version 1.4.2), so that the way to make the map from level 0 (initial) to level 3 deliberately overlap is not good, because when it is reduced to the next level, two photos are reduced, two photos, two photos, two, two, two, two, two, two, two.The map can be connected together.After the Java version 1.8, because the map is no longer generated by players, it is aligned with the corresponding grid. Therefore, it is easier to build a map that happens to be connected with each other, although some players do not like this.
Map basis
No matter what you use, this knowledge is useful to you when you create a map.For example, you want to create a "Map#0" on the area you want to cover.When the map is made (the center of the center is placed, 8 grids around the paper), they are "empty maps".Holding a empty map, right -click to activate it, and it will show the terrain in the area with you as the center, with a radius of 100 to 120 blocks.The length and width of the zoom level of 0 are 128 blocks, and the area covers the area of 128 × 128.Therefore, if you are in the center of or close to the center of the map display area, the scope of the display can almost cover the entire map.
If you want to keep this map, you can copy it.In the production area or workbench in your backpack, a map that needs to be copied and a "empty map" can be replicated.Place a map with a zoom level 0 in the middle of the workbench, surrounded by a circle of paper, then a map with a zoom level 1 will be made.This map will cover an area of 256 × 256 square meters, and the label will also become "Map#1" (assuming that no map is created during this period).
This step can be repeated 3 times to obtain "Map#2" (512 × 512), "Map#3" (1024 × 1024) and "Map#4" (2048 × 2048)
Draw a map
(The following number assumes that you only create a map discussed here, not the map created by others)
First of all, move to the rectangular range of the 64 -frame from the X -axis and Z axis (clearly the point is that the X -axis and the Z axis are within 64) and activate an empty map ("Map#0").Use the above method (introduced in the "Map Basic" section) to expand its scaling level to 1 ("Map#1"), and then use the above method to create a level 2 (this refers to its zoom level level, The same) map ("Map#2"), continue to copy this step to the map 3 ("Map#3") map.At this time, copy a level 3 map ("Map#3 copy") and extend it into a level 4 map ("Map#4"). A large -scale map can provide a clearer direction for your exploration.
Of course, creating some 3 -level maps compared to level 4 maps, some details can be displayed (the cost is not convenient, and it is recommended to put it in the display box).If you are going to do this, you should move north to 64 blocks of distance coordinates (0, y, 1024), and use a empty map to create a new map of 0 ("Map#5") with a empty map ("Map#5"), And then zoomed into a map ("Map#8") with a zoom level and retained it.Then move to the east to 64 grids from the coordinates (1024, y, 1024), continue to create a new map ("Map#9") and expand to level 3 ("Map#12"), and keep it.Just follow the clockwise direction, go south to the coordinates (1024, y, 0) and repeat this process, and so on:
| Map #n | X -axis coordinate | Z axis coordinate | relative position | |
|---|---|---|---|---|
| Map#16 | 1024 | East, 3:00 direction | Map#20 | 1024 | 1024 | Southeast, 4:30 direction |
| Map#24 | 0 | 1024 | South, 6:00 direction | |
| Map#28 | -1024 | 1024 | Southwest, 7:30 direction | Map#32 | -1024 | 0 | West, 9:00 direction | Map#36 | -1024 | -1024 | Northwest, 10:30 direction |
Follow the relative position of the map
A useful way to display the relative position of the ground icon is to make 10 items display boxes and place them on a wall (the size is not less than 3 × 4, and it is recommended to be 3 × 5).Place the nine maps on the corresponding item display box according to the orientation, and then place a level 4 map on the large map as a thumbnail.Put a notice sign to write some necessary signs and possible coordinates.You can also copy any map to carry with you, and fully explore the excavation area that has not been explored.The information of this copy will also be automatically updated to other copies of it.(Please note! If the map used to explore is not a copy replicated by the workbench, but the map drawn again, then this map will not be able to update its "copy" map, even if this map and its "copy copy and its" copy ""The area covered by maps and explorations is exactly the same.)


The map placed in the display box (Note: 1.7.2, the map in the item display box is displayed in a size of 1 meter*1 meter)
In the illustration, the notice sign has shown the number of all maps ("Map #N")."Map#127" is a map located in the center."Map#185" is a map located in the north. "Map 189" is the right of No. 185, so as to push clockwise.
Another method is to use a box and store the map corresponding to the position where the box is located.If you use this method, after the map is drawn, you have to pay attention to put them in the right place.
You can also use books and pens (note that ID is not applicable after color update (1.8), if necessary, please check it yourself), briefly introduce the map related to it on the homepage of the book.Then remember the interesting or useful place coordinates found during the exploration of this map, and then place the books and pens and maps for easy review.
Avoid overlapping
After the appalling update, the No. 0 map will not overlap, and they will be created at 128 yuan from other maps.Because the most central map has a (0, y, 0) origin, other level 0 maps will adjust their orientation according to the central map.The difference between the coordinates created by all maps (X -axis coordinates and Z axis coordinates) will be a multiples of 128.
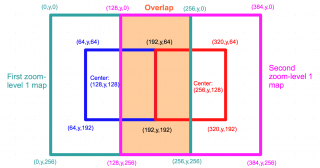
Two -level 1 map of overlap
The higher -level map "can" overlap each other because they are only 128 blocks in the center of the map before the enlarged map.For example: Level 1 map covers an area of 256 × 256 square meters.Therefore, a centers of 0-level maps at the center (128, y, 128) will be covered by (64, y, 64)-(192, y, 64)-(192, y, 192)-(64, y, 192)四个点所围成的正方形的区域,放大至1级,那么它会覆盖由(0,y,0)-(256,y,0)-(256,y,256)-(0,y,256) The area surrounded by four points.And a level 0 map (256, y, 128) on the right of this map will be covered by (192, y, 64)-(320, y, 64)-(320, y, 192)-(192, y, 192) The area surrounded by it will be covered by (128, y, 0)-(384, y, 0)-(384, y, 256)-(128, y, 256), surrounded by (128, y, 0)The area.The right half of the map mentioned above and the left half of the maps mentioned in the first place overlap each other.The illustration of the illustration on the right will provide you with a little help.Therefore, in order to prevent the level 1 map from stacking each other, the two 0 -level map X -axis coordinates and Z -axis coordinates need to be 256 square meters apart.Correspondingly, in order to avoid the overlapping level 2 maps, then level 0 map X -axis coordinates and Z axis coordinates should be 512 cells. In order to avoid the overlapping level 3 maps, the level 0 map X -axis and Z axis coordinates should be 1024 grids; for in order to in orderAvoid the overlapping level 4 maps, then the X -axis coordinate and Z axis coordinates of the level 0 map should be 2048 grid.
Tip: The number and central coordinates or renamed this map marked with a notice sign made it easier to find.In addition, copy this map with the workbench, place this copy map in the item display box, and the green pointer will be displayed on your original map and the copy map hanging on the wall. The green pointer is the item display box.The location of the map is located.
Tip: You have to say that the open -air lava pond is a good landmark. The colors of their maps in the map are orange -red, which is more eye -catching.However, the larger the level of the map, the smaller the size of the lava pool.Of course, you have to ensure that the lava pool is open -air (part of the completely transparent block will also cover the lava).For safety, you may need to surround these lava pools to avoid slipping into them.Another thing is that the lava pool can be visible even from a long distance.

National Service DNF Dark Ni
2025-01-28 09:19:27
The new screenshot of the be
2025-01-28 09:18:57
The 15th anniversary wallpap
2025-01-28 09:18:27
3DM Xuanyuan Sinicization Gr
2025-01-28 09:17:57
French magazine is the first
2025-01-28 09:17:27
The sneak game "Republic" wi
2025-01-28 09:16:57
The story between humans and
2025-01-28 09:16:27
Capture "Trinity 3: Artifact
2025-01-28 09:15:27
Wind direction change "Myste
2025-01-28 09:14:57
DICE's new project "Dream" w
2025-01-28 09:14:27
Pirate Minecraft Skins
Minecraft Skins
2024-12-10 04:11:27
Pirate Minecraft Skins
Minecraft Skins
2024-12-10 04:11:26
Master Minecraft Skins
Minecraft Skins
2024-12-10 04:11:25
King Minecraft Skins
Minecraft Skins
2024-12-10 04:11:25
Guide Minecraft Skins
Minecraft Skins
2024-12-10 04:11:24
Dark Knight Minecraft Skins
Minecraft Skins
2024-12-10 04:11:23
Sparta Minecraft Skins
Minecraft Skins
2024-12-10 04:11:23
Moncraft Skins of the War
Minecraft Skins
2024-12-10 04:11:22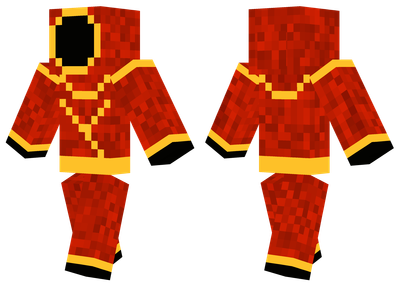
Red Witch Minecraft Skins
Minecraft Skins
2024-12-10 04:11:22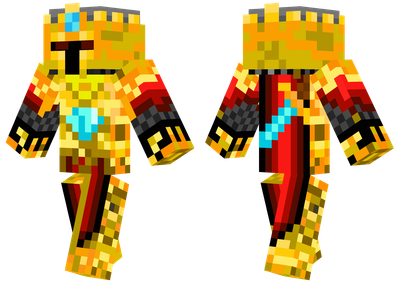
Golden Cavaliers Minecraft S
Minecraft Skins
2024-12-10 04:11:22