2024-12-18 03:43:25|Myriagame |source:minecraft skins
The command block is a block that is mainly used for adventure mode, automation of multiplayer games, and custom maps.
Get
Players with a single -player mode with administrators or opening cheating can enter the command /GIVE @S Command_block to get the command block in the chat box to get the command block.
Basic selector
Use the selector to replace the use of the physical name:
| Target | @a | All players | @p | Recent players | @R | Random players | @e | All entities | @s | The entity of the execution command (if the command is executed by the command block or server console, no entity will be selected) |
|---|
The command block has a variety of uses, such as changing the difficulty, changing the state of the weather, or giving you the specified items.They can only be used when cheating.
Instance
Here are some examples of use:
Give a random player a item and tell everyone

Cookie Giveter 5000X
This device will give a random player five cookies, and then tell everyone.
First create a scoring board (the name is arbitrarily, note that unless you are testing, do not display it), such as "cookie".
/Scoreboard Objectives Add Cookie Dummy {"Text": "Cookie"} orsesty = "NOWRAP">/Scoreboard Objectives Add Cookie Dummy Cookie ️ [Only Basan Edition]
The command of the first command block:
/Scoreboard Players Set @R Cookie 1
The second and third commands (the two can be reversed, but they must be activated at the same time):
/say @a [scores = {cookie = 1}] has been given five cookies.
/GIVE @a [Scores = {cookie = 1}] Minecraft: Cookie 5 ☆ AP">/give @a [scores = {cookie = 1}] cookie 5
The command of the fourth command block:
/Scoreboard Players Set @a [scores = {cookie = 1}] cookie 0
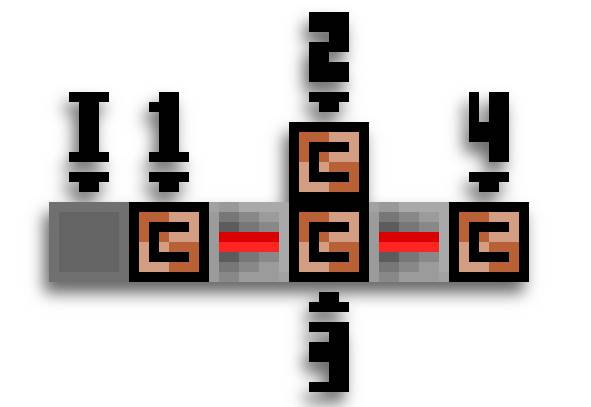
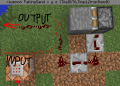
The i in the figure above represents the input of the redstone signal source.(It is recommended to use permanent redstone circuit)
Transmit
You can transmit by using /tp << i> x > << i> y << i> Z > EssenceAmong them, << << i> y > indicates the coordinates of the vertical direction, << << i> x > and << i> Z> indicate the coordinates in front and back, left and right directions, players can pass through this command to ( x , y , Z ) The position of this coordinate.If you want to transmit the position of the current station as the benchmark, you only need to add a ( x , y , Z ) coordinates in front of the coordinates ~That's how, for example, /tp ~ << i> x > << i> y > ~ > x , y , Z ) are input /tp @p ~ 3 ~ 4 ~ 5 , then he will be transmitted to the coordinates of (4,6,8) , and enter the /tp @p 4 6 8 is an effect.Player Safety System
The command block can also make a security system.Just place a pressure board in front of the iron gate at the entrance of the building, and enter the command in the command block: /tp @p [r = << i> radius >, name =! << i> Your player name >] << i> x > << i> y > << i> Z > [Only Bidth Edition] or /tp @p [Distance = .. <>, name =! "<< i I> Your player name > "] << i> x > << i> y > << i> Z > ☆= "NOWRAP"> [Only Java version].For monsters, simple fences or lava moat can achieve their goals.
Vendor
Similar to the concept of the elevator, it is used to move the entity to the X or Z coordinate.
Can be built in the following way:
Use /file << i> x > << i> y <<< i> z > << i> x2 > << i> y2 > << i> Z2 > << i> blocks > ☆/Fill << i> x > << i> y > > << i> x2 ><< i> y2 > << i> z2 > << i> blocks > << i> data value > orsesty"Nowraw"> [Only Big Rock Edition] The command is filled with a square block.Place a circular command block on the side, and input: /Execute as @E AT @S If Block ~ ~ -1 ~ << i> 方 > Run TP ~ -0.1 ~~ ☆ /execute @e ~ ~ ~ ~ ~ ~ << i> blocks > << i> Data value > tp ~ -0.1 ~ ~ ~ ☆ [Only Bidth Edition].
Standing on the filling square now, you will automatically move in the specified direction.The ~ -0.1 ~ ~ ~ in the command can be replaced with the coordinates you want, but don't change it to ~ ~ 0.1 ~ or ~ -0.1 ~ .
Shielding command block output
When the command block is triggered, an information will be automatically output in the chat bar, such as: " [@]: 1 entity ".
You can use this command to block the command block output: /GameRule CommandBlockput False .
The output of the shielding command block can bring a better gaming experience to players.But it will make it difficult for players to directly understand the execution results of the command block.
Use /Gamerule CommandBlockput True to restore the command block.
Permanent day
After 1.6.1 (13W24A), you can enter the /Gamerule DodayLightCycle False command by entering the chat menu and OrderCome to get forever.
By using spider web and mining carts, you can use /Time Set 0 to skip the night.A mining car takes 31 seconds through a spider web.Therefore, it can achieve permanent day by using 23 stack of spider webs and detecting rails and several charging rails.
Or, you can also place a drop object on a wooden pressure board or measured pressure board to achieve it, and the drops will be cleared every 5 minutes.0, it will also trigger a transmitter (or thrower) and throw a new item on the wooden pressure board.5 minutes is a one -day cycle and will trigger resetting time before the monster is generated.However, this method is limited to 64 × 9 = 576 cycles after the block is loaded, that is, 48 real -hour game time.In the monster grinding, you can fill the gunpowder, arrows or carrion in the launch.Another method is to use the command block.(For example: /Summon item ~ 1 ~ 0 ~ 1 {item: {id: "brown_mushroom", count: 1}} orsestyJava Edition] The advantage of this is that it does not have a 64 × 9 grid limit like using a transmitter.
Both methods are required to keep the block loading to make the system work.You can use the /Forceload Add ~ ~ command on the machine to keep the mechanical block is often loaded.
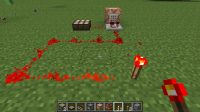
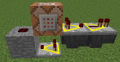
Or you can connect the command square to a repeated redstone pulse, such as a 5 -minute, a certain type of cycle, or the sunlight detector shown in the right figure.In order to prevent the chat box from being swiped, use the command /GameRule CommandBlockput False Turn off the message output of the command square on the chat box.Note: This method can be set with different commands to set a variety of things.(For example, to make the weather forever, add another command block in the cycle, and use the command /weather clear .).
In order to switch between different functions, you can set a and the door in front of the command block, place a tie rod on one side, and set some circuits on the other side.
The use of sunshine detectors is a more direct method of Yongye.
When there is no enough brightness to allow the sunlight detector to provide a signal for the redstone fire handle in the distance, the detector stops filling and starts the command square, and sets the time to 8000.In other words, when the brightness is too low, the command block will set the time to noon.When the command is activated, the brightness will change with the distance of the redstone line, and the time it sets changes with the time entering the command block.
To do this, first of all, you need to put the sun detector in an open, open -air area.Then you need to set some redstone lines from its adjacent position.The distance of the redstone line depends on how much delay you need.You can only send a signal from the sun to the other end of its end.Next, put a square on the other end of the redstone.Put the red stone fire handle on the side of this block and set a command block on the top of the torch.Right -click the command block and enter the command. The command starts with the /Time set ending at an effective time value.This value is the value set to the time when triggered.At midnight is 18,000, 12,000 in the evening, and 6000 at noon.This design can be used on the map to keep it in a certain time.But this simple device can only be used to create a mode or start cheating.
There is also a more compact design.If you use a sunshine detector as the first input of a redstone comparator, a 15 -intensity red stone line (red stone or red stone fire handle) is placed on the comparison end, and then sets the comparator to comparison mode (The front torch is extinguished), the comparator will start immediately after noon.
Easily set up day/night
Place the sunlight detector on the command block, and then press the use key to set it to the luminous detector.Add the command /time set day to the command block.Or if you want to be at night forever, you can add a sunshine detector, do not right -click it, and add /time set night to the command square.
Wireless redstone
You can use the command block and the record plate system to achieve wireless redstone.This process involves using a division variable variable, which searches from the command blocks that are attached to the clock circuit output.Then use the redstone comparator on the wireless output command box.
Wireless redstone can also be implemented by using objects instead of variables.If the output command block is set to try to delete an unwanted object, you can create a redstone signal by adding said objective by using command blocks or chat commands.The advantage of this method for the variable method is that it does not depend on participants.
To this end, place a command block at the input and type the command /Scoreboard Objectives ADD << i> Object name > dummy Block, enter /Scoreboard Objectives Remove << i> Object name > , connect it to the clock circuit, and then on the commandPut a redstone comparator on the outside of the block, and then put a redstone relay.Then use redstone relay as the output.
Stop state.
Trigger state.
Trigger status command.
Stop the status command.
Set wireless output.
Wireless output command.
Another wireless redstone using the /call command.The commands used here are /Summon Fallingsand -118 150 -60.5 {Tileid: 76, Time: 1, DropItem: 0}
You can also use the /setBlock command to achieve wireless redstone instead of the scoring board system.All you have to do is to set the command square to set the coordinates of a red stone adjacent to any of the block to the target coordinate, and set it to the same coordinates as a command block connected to the reverse signal.
Wireless button see: button § data value and tie rod § data value
Technically, this can be completed on any square, but the buttons, lever and other blocks that can interact can increase interesting effects.Although it is very mysterious on the server, it is actually very simple.It uses the /Execute command.It uses a command block, a redstone comparator that converts the command to the redstone signal, a block to be tested, and a clock circuit that repeats the command block.This is an example of a wireless button: /Execute if block 123 123 stone_button [Powered = true] Enter the coordinates and names of the specific blocks to be tested. In this example, the stone buttons located in 123 12 123 .This can be used on any block that can be changed.Note: This value changes according to the state of the block. For detailed content of the data value, see the button#data value and pull rod#data value.
Entry package
By using the parameter [Gamemode = << i> mode name >] you can make a kit on the (server) map that can only be obtained once. First, dig 3 on the ground.The square, then place a line of command block (one item in the toolkit).In the interface of the command block, enter the /GIVE @p [Gamemode = << i> Initial Mode >] << i> Id > << i> Number > .In this way, they will get what you want to give them.Enter /Gamemode << i> Non -initial game mode in an additional command block > << i> object > Redstone connects the entire command block.Fill the hole and put it on the pressure board.When the players walk over, they will get the tool pack they deserve, and they will not get more kits because they have changed their game mode.
(Note: This command can also be completed through the scoring board. First of all, establish a scoring board and name it, such as /Scoreboard Objectives ADD <> dummy [<> dummy [< Display name >] , and then give the items given by the player with a notes of 0, such as /give @p [scores = {<< < Rente Board Name > = 0}] << i> Items > [<>] Finally set his scoring board value toThe value of non -0 is as follows as /Scoreboard Players ADD @P << i> The name of the scoring board > << i> Any non -0 value > At the same time, you can also repeat the above steps through different scoring board names.)
As a substitute for pressure board
Is it boring that there are only four materials for the pressure board (stone, wood, iron and gold)?Now you can no longer bother this problem.You can use the command /execute , and the area size with a command square with a clock circuit instead of the pressure board.Command /Execute as @a at @S If Block ~ ~ ~ #Sand Run TP ~ 3 ~ orsestyWill detect whether there are players on any sand and send him three grids.Similarly, you can also modify the command after RUN to achieve different effects, or you can change the Sand to other squares.
For details: /Execute
Use the command block in a single -machine non -creative mode map
Through /Gamemode , you can also use the command block in a stand -alone non -creative map. Simple switching the game mode can use /Gamemode Creative Then set the command of the command block to any content you want, and finally use the /Gamemode Survival to switch back to the survival mode.The command block only needs to be set in the creative mode, but switching to the survival mode can still work normally.He can also be used for transmission (such as a distant fortress, mining underground, or on an floating island).If he needs you to spend a long time to reach there, and then you don't mind that he is a soft cheating, so you can build a transmission system.Please make sure you are creative mode when you set the command block (please use /Gamemode Creative . If you do not open the cheating options, open the local area network mode setting), but you still you stillIt can be used in the survival mode.Enter /tp @p << i> x <<< i> y <<< i> z > .Then, use redstone (including buttons, pull rods, pressure boards) to activate this command block, and then you will be sent to the distant destination.You can build a variety of different conveyors.This can also be used to cross large projects, or if you transfer the box from the old house to a new house.
Explorer map drawing
If a person wants to create an explorer map of a single player, execute the /PUBLish command to make other commands (see below).
Application among multiple people (SMP)
This chapter detailed the application of command blocks in multiplayer games.
Transmission/transportation
Through the /TP command, a transmission device that everyone can use can be used.Can be used everywhere.For example, make a huge transmission system throughout the world, and all the portal entrances are gathered in the transmission hall, and the transmission hall can enter the entrance of each transmission point to reach the exit.In this way, a "fast transportation center" can be built.
"Fixed animation"
By using the /clone , or the Minecraft map editor, such as the Minecraft map editor, you can copy a picture (using the painting made of the square), and then paste it to other places (generally tightly tightly tightlyBefore the previous picture), and change some blocks of the painting, use some pressure boards or stumbling hooks. After the player appreciates the painting in a short time, the command block is made to make /clone commandCopy the set pictures to the viewing area.If a large amount of copying such parts is copied and the block is copied in order and a little delayed a little delay, then the player will have hallucinations. It is thought that this painting is exerciseCommand blocks to achieve fixed animation technology.
lottery
With the /Give @R command, a lottery can be created.But remember, the /GIVE command is to put the items directly into their backpacks instead of putting them in front of them.
prison
By connecting high -frequency red stones to a command block and using the /TP command, you can force players to stay somewhere.If you want to make this method feasible, use commands /GameRule CommandBlockput False in your chat window.Use the selectioner R and RM ∩ distance ️ [Only Java version], you can send them back after the player leaves a certain distance.
For players who are only specified mode
If you use the parameters [Gamemode = Creative] , then only players in the creative mode will be affected by this command. Of course, enter [Gamemode = Survival] Players are effective.
announcement
Note: Using the service terminal plug -in using Automessage can achieve the function of automatic announcement.
By using /Me in the command block, you can create an unmanned automatic broadcast (need to connect to the redstone element such as the circular redstone, etc.).The new command of the Java version 1.7+ /Tellraw {Text: "<< i> Information >" can be exempted from the beginning of [@] And can achieve suspended events and clicks.
The name of using an anvil to change the command block can be changed to [@] at the beginning to [<<, which is very useful.
Safe scan
Note: Most server management plugins support dangerous items.
Using the /Clear command, you can remove a certain item in the player's backpack.The specific step is this. Use /Clear <@a | Player name > << i> Clear item name > .If you want to achieve automatic cleaning dangerous goods, you need to connect to the cyclic redstone.
Referee
Using /say @p , the command block can report the latest players.If the command block is placed at the finish line, he will easily say the winner, but the /say will send information to all players. In order to prevent screening, it is recommended to use /Tell or /Tellraw .
Establish a protected area
Note: The expansion plug -in of server territorial plug -in such as Residence can achieve changes in the game mode in the territory.
You can create a "creation/survival mode area" through command blocks, but it is cumbersome.You can make a "fence" by limiting the range of the command block, and the players who pass the fence will become an survival or creative mode.Enter the command in the command block: /Gamemode Adventure @a [x = << i> Regional center coordinates > y = << i> Regional center coordinates > z = << i>Regional center coordinates > distance = << i> The smallest player search radius > .. << i> the largest player search radius >] Put two search for two searchIf the area does not overlap the command block, the player in the specified radius can change the mode.
No plug -in PVP
Use the command /GameRule Keepinventory True to close the items of the player's death (also retain the items and experience after the rebirth, so you need to clear the backpack after the player is reborn).Using /give @p << i> Item ID > can be given to player weapons (you can add NBT tags), you can design a complete professional system, players, players, players, players, players, playersChoose different occupations to have different equipment.Use /spawnpoint << i> x > << i> y << i> Z > Use /tp << i> x > << i> y > << i> Z > Players in the mobile mapTo the designated area.
Novice toolkit
You can simply use the command block to give novice bag without any plug -in: /GIVE @P [Distance = .. 2] Stone_pickaxe .To prevent players from pressing the button twice to get two novice bags, you can set the two command cubes after the button: 1. /GIVE @P [Distance = .. 2, Gamemode = adventure]Stone_pickaxe , 2. /Gamemode Survival @P [Distance = .. 2] .(At first, the player was an adventure mode. After obtaining the tool package, it was adjusted to the survival mode, and then the toolkit package was limited to the adventure mode.) Special color text
Although you cannot directly enter the color/thick/oblique text in the command block, you can edit the texts stored in the map or server through the MCEDIT editor.The Battle Rock can use "§" to change the color change, or even garbled (§K).Sethbling ’s MCEdit Filter: colourCommandBlocktext
At the same time, /Tellraw can directly use parameters such as "color" to get color fonts.
Alert system
When the player embarked on the pressure board, he could trigger the command block /say @p << i> Warning content > .
Reward house
If a player has a special contribution or a veteran qualification in the server, but it is not enough to give him the authority authority, you can reward him a set of diamonds or some strange things.Create a room that can only be entered by transmitting commands. Players who have contributed excellent contributions will be transmitted. Players will activate the command block in the room to get a reward. Then he will be sent back to the original land by another command block. If the server allows /back , transmitted to the original point twice in a row, so that the /back is invalid.(You can avoid players repeatedly receiving rewards)
Weather machine
Use /Toggledownfall and /Weather Thunder to start or end the rain (thunderstorm).Start or stop rain with your own wishes.This technology can be used for villagers and some redstone machines controlled by precipitation. You can control the weather without entering any commands (the administrator needs to activate the command block for automatic execution). Reasonable use will be very effective. For exampleBrush monsters.
Award competition
You can use /tp @p and /GIVE @P command to make an obstacle race or a virgin.Player teleportation back to the birth point or other places.
Time machine
Simulate two very similar environments on the map. The player transmits the player from one to another by the command block, and the time will be set to the start time. This seems to be a retreat.(Note: It can be widely used for the plot RPG map.)
Mines
Use the command /execute as @a at @S if block ~ ~ ~ #Wood Run Summon TNT ~ ~ ~ ~ Summon TNT when someone stands on the wood!Bang!
Security door
By using /Execute if entity @p [Distance = .. 5, name = << i> Player name >] ☆ >[Only java version] or /testfor @p [r = 5, name = << i> Player name >] ☆[Only the base rock version], the command block will detect the designated player within a certain range and open the door for him, and will only open the door for him.
(Note: /execute ™ [only java version] or /testfor [Only Basan Edition] command is a disposable command, the command block detects it once and the signal will be exported.)
This section detailed the application of the command block in custom maps.
There are many advantages in Minecraft using a large number of command blocks.For example: SETHBLING ’TF2 MAP
{#EV: Youtube | _F2BRU8HBWC | 425 |}}
Another excellent application example is Hypixel ’s Gladiator Arena. The combat professional system in this map depends on the command block.
{#ev: Youtube | jryjkwcqmzm | 425 |}}
"Silent" command square
It is important to control the command of the command block in the map. This can maintain the unknown and concealment of the player's unknown and plot. If the player sees the prompt information of various commands, the map will be tasteless.Turn off the output information of the command block (unless the /say command) uses /GameRule CommandBlockout False .
Shelter/Corner Farm
Players who enter the castle with a stressboard or stumbling line (take safety castle as an example) are difficult to be peaceful (depending on the situation of different areas).The castle gate can have a stumbling line connecting the command block. The /Difliculty PeaceFul can be written on the command block. Once the player walks through the stumbling line (or pressure board), activates the command block, it will change.For peace difficulty, this can create a "refuge".Conversely, you can use the same way to create a "difficulty area", which will become difficult when players enter.
Control of players in different game modes
Usage [Gamemode = Creative] You can set commands to only be effective for players in the creative mode. The survival mode is [Gamemode = Survival] .Example: Players who transmit all creative modes to 254, 47, -874, the command used is /tp @a [Gamemode = Creative] 254 47 -874 .
"United" residential
Build at least two buildings, set up a /TP command block at the entrance or exit of the room.In any place, you only need to pass the command squares at the entrance, and the player will suddenly feel that the internal space in the building with a small outside building is so large.Using this method to combine multiple buildings, which can be used as a transient in the scene with the server or single map.
place of birth
Using /Spawnpoint can set the place where the player is born.(The application is very wide, PVP map, RPG map, etc.)
Lava parking
As mentioned earlier, /Gameerule Keepinventory True can save the backpacking items after the player's death.Set up such a command block at the starting point of the parkour map, so that players who drop the lava death will not lose the items. At the same time, the record point can be done with /spawnpoint .
I want to sleep!
Using /Spawnpoint can set the birth point directly, but you need to skip the day when you need to /time set <> > > > > command, 18000 is at night (not absolute, you can set up by your preference, not less than 12500), so that you can simulate the effect of sleeping.(Available /Time Set 700 directly turns to the day, /spawnpoint command and /Time Set700 Can you simulate sleep?) Time and the scenes in the weather
For example, your map is starting on a cold storm night, you can set up suddenly sunny, there is a bright sun outside!Or, if you want to start a bright day, you can't help the rain suddenly?Don't be afraid, there are /Weather command.Just use /weather , just enter it!You can also use /time set Input: 0 is the early morning, 6000 is noon, 12000 is dusk, and 18000 is midnight.
Detecting the world if it is switched to peaceful difficulty
Create an attacking creature and put it on the pressure board.(Please make sure it keeps pressing the state, so be sure to ensure that it cannot jump or walk away).Make a redstone circuit to activate the command block when the pressure board does not receive the redstone signal.Set a message in the command block that notify the player's map due to the difficulty of switching to peace and difficulty, and the monsters you need have disappeared. Please download this map again.You can even make an invisible transmission command block, switch those players who deliberately switched to the creative mode, and then transmitted to a base rock house, so that he cannot use the /kill Or /TP command, and set his rebirth point in that house, so that he could not see it eternal!(If a single person, you can click "Open to the LAN", or edit it with a modifier)
Talking adventure map (there is a task system!)
The /say command can directly send messages to the player.It will be better to use the command block, so that you don't need to put a lot of notices and books that are too large to tell players to tell the game rules.You just need to put the command square into a line and then get the delay between the intermediate parts in the middle pavement (to prevent the order output of the command output in chaos).The box is removed.
Some are used with NPC.Imagine what you entered the blacksmith shop and what you want to let the blacksmith in it say something.Before the command block appears, you need some books and signs to act as the effect of the dialogue, and then create some rooms in the blacksmith shop and put some debris, which will make this blacksmith shop look very messy.But now, you only need to use the /say command to create the effect of blacksmith's speaking.Maybe the pigs behind the counter will ask for mercy!Let's take another example: In a factory, a sound of alarm bell remarks that the factory is in danger.Use this method to tell the player in the chat box to maintain a tense atmosphere, especially if the text should be used for a long time.This can also be used in a timing bomb device. If the player sees the countdown in the chat box, he will be able to better bring emotions into the map.
The last point is not unimportant. It can establish a task system easier to make our players start the task.Players will activate the RS NOR locks after the pressure board (so it cannot be activated again), and then use a command block with a /say command to express the butcher's requirements for the player's requirements for the player.EssenceHe needs to kill a pig.When the player kills a pig standing on the stone pressure board, the circuit will be closed, so that the player will activate another circuit after returning to the slaughterhouse, including another RS or locks and two commands with commands.The first command was the /say command of the butcher thanked the player. Another command was the /GIVE command that enabled the player to get.In addition, don't forget to use the target selector @p so that the butcher said the player's name.For example, set the command block to: /say thank you, @P.You helped me kill the pig., the chat box will display: [@]: Thank you, << i> player >.You helped me kill the pig. This makes the map cooler, it looks like it is made for players, because his/her name is written on it!Establish a store
By using /give @p [level = <'' level ''> ..] << i> Items > > And /Experience Add @p [level = <'' 'level' '> ..] <> levels In terms of, if you put two command cubes, one input /give @p [level = 5 ..] Grass_block 64 command, another input /Experience ADD @p [level = 5 ..] -5 Levels command and connect to the same redstone circuit. When the command block is activated, it will deduct 5 players from levels higher than 5.Wait for the level and give players 64 grass blocks.
By using the command /Experience Add @p [Level = 3.] -3 Levels The minimum experience required to execute the command execution can be listed in the bracket.
You can use the command block to create a customized villager who sells any items.For example: /Summon Villas ~ -2 ~ 0 ~ 0 {Profession: 3, CustomName: Blacksmith, CustomNamevisible: 0, Offers: {Maxuses: 13, Buy: {id: 388, C. OUNT: 5}, Sell: {id: 283, count: 1, tag: {ench: [{id: 16, lvl: 9}, {id: 20, lvl: 6}], display: {name: molten Gold Sword}}}}}}}}}}}}}}}}, {maxuses: 13, Buy: {id: 388, count: 1}, self: {id: 280, count: 1, tag: {end: [{id: 16, lvl: 5}], display: {Name: whuppin stick}}}}, {maxuses: 13, Buy: {id: 388, count: 2}, self: {id: 369, count: 1, tag: {id: 16, lvl:5}, {id: 20, lvl: 10}], Display: {name: radioactive whuppin stick}}},]}}
The part of the Buy label is the villagers 'purchases, and the part of the Sell tag is the villagers' sale.If you don't want the number of trading times, you can change the maxuses tag to 1000; if you want to make it a project that can be traded once, you can change the Maxuses changeIt is 1.Note that the first item (Jin Jian) here has an enchanting (sharp 9) beyond the range.Yes, this is feasible, but before making the effect beyond the range, what kind of enchanting effect must be studied, because there are some things that do not do anything, and even have a negative impact ("look at the water underwater" underwater breathing,The side effects make everything dazzling white at a high level, just like you sneak into the Arctic waters full of mud).As for the golden sword, remember that the golden sword is worn too fast (after all, people call the butter sword for a reason).A 10 -level durable enchantment will reach a decent durability level.In addition, the other two "weapons" are actually a wooden stick and a flame stick with weapons.The use of any non -weapon as a weapon will cause the same damage as the karate (1 (
)), but the enchantment on these weapons makes them the same as the sword that is unparalleled.Its advantages are that wooden sticks, flame sticks or other items can be used unlimited.The same technique can also be used for biological heads and underwater breathing 3 to create an infinite durable diving mask.
Brush
You can place the monster cage through the /setBlock command, for example: /setBlock ~ 1 ~ 0 mob_spawner {EntityId: zombie, spawndata: {equipment: [ {{ID: "Minecraft: Iron_sword", Count: 1}]}} The brushing cage with a zombie with an iron sword will be placed.Almost all the entities of players can be generated through custom brushing cages, including mining cars, fireballs, arrows, snowballs, last shadow pearls, splashing potions, fireworks rockets, lit TNT, drops of sand, dropped, droppedThe falling red sand, the drop of sand, painting, item display box, experience ball and even drop objects.
You can place the pork, cattle, or chicken brushing cages in the backyard of the butcher's house of the village to create eternal source of meat, such as: /setBlock ~ 1 ~ -1 ~ 0 mob_spawner {Entityid: Chicken, maxnearbyntities: 10, RequiredPlayerrange: 16, spawncount: 6, spawnrange: 2, mINSPAWNDELA y: 50, maxspawndlay: 200, spawndata: {id: pig "}} Put the "chicken riding inThere is no limit to how many creatures riding on another creature. For example, you can place a pig riding a chicken.Riding a horse, the horse also rode a tapeworm, and at the same time, the tapeworm was also riding a villager, which was "Farmer Brown".Please note that if you want to use Requiredplayerrange tags, then you must use the Maxnearbyn Tities label at the same time. AY.Finally, please note that the y value used in these two monster cage example commands is ~ 1, (assuming that the player does not fly) means that the brush cage is placed below the player.
If you don't want to specify a special player, you can use @a (all players), @p (recent players) or @R (Random player) parameter instead of << i> Player name > .Remember, you can use @p (recent players) or @s (yourself) as a better replacement than entering your own name than entering your own nameBecause you will always be you for your recent players.
1. The foundation
The following command will place a monster cage of summoning zombies at x coordinates:
/setBlock ~ 2 ~ ~ minecraft: mob_spawner {EntityID: zombie} The basic command below contains 6 types of setting parameters:
/setBlock ~ ~ ~ ~ -1 ~ -3 mob_spawner : 200, maxspawndlay: 800}
![]()
remind:
![]()
All time is calculated based on "game carving" (1 second is equivalent to 20) 200-800 games is 10 to 40 seconds.Remember that the parameters are one pair. If the parameters are not matched, it will not work properly. Spawnrange requires RequiredPlayerrange work, and vice versa, MINSPAWNDELAY requires Maxspawndlay work, and Spawn Count You need to work There is also a parameter called Delay to control the delay of this monster generation to the next generation time. The game is carved as the unit (1 second equal to 20 games). and MINSPAWNDELAY Randomly select one number of values.If the coordinates are set at ~ ~ -1 ~ -3 , they will use the command block as the benchmark to the y coordinates one square block, towards Z The coordinates reduce the brushing cage at the three squares, which may place the brush cage on the ground.Remind you that the parameter of the Spawnrange of the monster cage is only effective in the horizontal direction, not vertical direction.In the vertical direction, it will only generate creatures at the same height, or lower 1 or high, so although the embedded ground will reduce the production area by 2/3, it is helpful to hide it.Naturally, its height is reduced by 1/3 because their height is 1 higher than the ground than 2.The values used above are default values.2. Customized creatures
What to do next is to modify and generate data.Generate data Tell the monster cage. You want a non -standard monster, such as a zombie with a diamond sword and a chain helmet:
/setBlock ~ ~ ~ 1 ~ mob_spawner {EntityID: zombie, spawndata: {equipment: [{id: diamond_sword ", count: 1}, {}, {id:" minecra ft: chain_helmet ", Count: 1}]}}
Using ~ instead of the value of the coordinates, because the 6 parameters in the previous example are used, they are all default values.Note: The order of the five grooves is Hand (hand), BOOTS (boots), legs /code> (chest armor) and helmet (helmet).Note that you must also specify the empty slot, unless it will be empty grooves in the future, for example, if you only need to specify the weapon, the next four grooves can be omitted;Both the leg protection, the first, second, and third grooves must be displayed, and the four and fifth slots can be saved.Remember, although it is a damaged helmet, as long as you wear it, those creatures that will burn due to the sun can survive.Although most of the code allows you to ignore the Count tags, the count tag itself is very important.An item without a count is a zero stack (more popular is "ghost items").Ghost items disappear when the player is used for the first time (this is a failure), but monsters can use ghosts without affected (this is why the code is omitted by the code).If the monsters have dropped these items, the players who pick them up can not use these items, so it is strongly recommended to use the count tags.
The next custom monster is a skeleton. It holds a arched bow of Fireya, wearing a customized biological head wearing II enchantment (spiders need network connection, otherwise only Steve heads will be displayed) and ride on the skeleton.
/setBlock ~ 2 ~ 1 ~ 2 spawner replace {EntityID: Skeleton, spawndata: {equipment: [{id: 261, count: 1, tag: {id: 50, lvl: 1}]}}}}, {}, {}, {}, {id: 397, count: 1, damage: 3, tag: {ench: [{id: 0, lvl: 2}], skullowner: mHF_SPIDER}], Riding:{ID: "EntityHorse", Type: 4, Tame: 1, SaddleItem: {id: 329, count: 1, damage: 0}}} Strictly speaking, the skull is just sitting immediately because the skull is because the skeleton is because the skeletonThe movement depends on the horse it rides, and the horse will not hostile to you.Be careful not to put zombies (or other melee creatures such as zombie pigs) on the horse back. Their attack range is not enough, so they can only do nothing and do nothing.Fortunately, no matter how Malaysia moves, the skeleton can shoot.As for the horse itself, its type is 4 (skeleton horse), the tame is set to 1 (yes), and is equipped with a saddle (in fact, which sadders we specify that they may eventually there may be more than one type of type in the endTo.From a technical perspective, you can set up a multi -class creature, but you will soon realize that it is not wise.
Third, spawnpotentials label
We can use Spawnpotentials tags in the brushing cage to generate a variety of entities.When the timer is reset (one second after the first creature is generated), it randomly selects a label to generate.Because these code contain multiple creatures, they are often quite long.Thanks to a YouTuber (Dragnoz), we know the fact that the code can be "decomposed" (the command block ignores the symbol, so you can start a new line to make one part end, where the other part starts to startIt becomes clearer, and this will not destroy your code).The following is an example of spawnpotentials code. It looks more "pleasing to the eye":
This command is too long, you can view [display] with the [display] button
This command contains many code because it is actually 6 independent creatures.Among them:
Before the spawnpotentials tag: The first part will not appear again after appearing.If you want it to appear again, you need to include it again in the part of the Spawnpotentials .This creature is a random wearing blue dyed leather pants, green dyed leather jacket, and a wooden sword zombie.It is also a zombie, but the durability of this zombie's wooden sword is only 3.The next one looks like a ninja.It is a skeleton, but holding an iron sword.All its armor is stained with ninja -like black.The skeleton with a sword can shorten the distance from you faster than zombies, so be careful.There is a zombie with a stone sword and chain armor.The armor is attached to the protection II.Next is a golden sword, a golden armor, a pumpkin on his head, and a fire zombie.There is a protection II and flame protection X on the pumpkin, and try to stand up and threaten the player for more than 5 seconds regardless of everything.Although this is effective, but if the player chooses to stay away, Mr. Pumpkin will be burned to death.Oh, its sword seems to be on fire.There are zombies with iron swords and iron armor.There is a sharp II on the sword, and the protection II is attached to the armor.The last creature, a Fake HB, has a high -level diamond armor (with flames to protect IV and drop diamond boots that protect IV, wearing diamond pants with explosion protection IV, with diamond chest that protects IV.A, and protecting IV, flames to protect IV, explosion protection IV and underwater respiratory III), and a sharp IV with sharp IV, repel IV, limb killer IV, plunder III and durable III diamond pick.In addition, it also obtained Customnamevisible (set to 1 to represent yes), Customname , and PersistenceRequired (set to 1 indicate yes)EssenceThe last attribute will prevent it from disappearing, although it can be killed by normal means (if you can defeat this diamond cover and IV enchantment).Fortunately, it is relatively rare (see below).
Except for that ninja, there are 5 different swords and armor here.Note that the Weight < tags need to be used after each Spawnpotentials .This determines the chance of the creature that is selected and generated.Specific numbers don't make much sense, which is only the proportion of numbers.For example, if you want to generate the probability of all pre -organized creatures, you can set each Weight to 1, and it is not different to change them to 8 (the proportion between them is still the same), but it will except for exceptThe change of all other weight outside a certain one will make the possibility of 1/8 of which 1/8 is the same as the remaining 1/8.In this code, the default value is 4, while the ninja is only 2 (halved it the possibility it is selected), and Fake HB is only 1.Fourth, can ride a creature
Set the head of the creature as a mine car or boat, you can ride them.The command is quite simple:
/setBlock ~ ~ ~ 1 ~ spawner {EntityID: Minecartrideable (or Boat), spawndata: {riding: {ID: << i> Entity >}}
hint:
Some creatures cannot be generated by brushing cages, such as boss and iron puppets.Adding a mining car will not affect them.Handicular monsters with shooting ability can be used to deal with survival players.Please pay attention.Evil soul cannot ride.Mine cars will be stuck in their heads, which is useless for anyone.The last filmmaker can't walk around, but can be transmitted by throwing or shooting (such as snowball).Leopard Cat is one of the fastest monsters because they want to escape you.They can also control the place where you want to go.Spiders are the only creatures to slow down when riding.Slime and its close -up magma monster cannot change the size.There are several ways to use more command blocks and recursive recursion to combine the command group into a command.Use the following command set for recursion:
/Scoreboard Objectives Add Counter dummy /Scoreboard Players Set Target_Count Countr << i> TARG et count > /EXECUTE If Score Count Count /Execute Unless SCORE t counter /Scoreboard Players Add Count 1
To run multiple commands, please generate an command block mining car on the activation of the rail.There are also some commands called a command tool to use this strategy.Use /Function .See: Function uses maps as the basis of customs clearance (Scroll)
Youtuber "Sethbling" uses maps as a basis for customs clearance. When the blank map is used, it will become a general map. At that time, the command will immediately remove the map from the player's item bar and execute the command (summon creatures, transmission, transmissionPlayer), at the same time pass the level.
advantage
Quick interaction.Compact system.Simply trigger, just use the right button to activate.
shortcoming
Rolling can only have one purpose, that is, if you do not use complex data values, you cannot transfer rolling and intensity rolling.Players may see the map animation when they activate the map before deleting the map.Players cannot use map items during the game (display SMS, path, drawing ...).
Mechanism construction
Players can change the display name of the project, allowing the player to better understand the object and use tool prompts to display.Use the following command to provide players with custom naming maps: /give << i> Players > Map {display: {name: ">" "" ", Lore: [<< i> Tooltip > "]}} Player: Players you want to contact ( @p , @a [arguments] ...).DisplayName: Rolling in a hot bar or a name displayed when hovering with a mouse.TOOLTIP: The text below the name of the hover project.
Detect the activation of the map
These two funnels form a red stone clock.You can use other shown clocks.Command block 1 contains the command described in the above section.If the player does not want to roll back after being activated, it can be canceled.Command block 2 contains inventory check commands:
/clear << i> player > filed_map
Command block 3 is the output when successful.You can do anything you want to do: such as giving players some effect, sending players to somewhere, and so on.You can also connect the output to the door, piston, or other blocks that receive redstone signals.
Advance
/Clear command can test other interactive items:
Check the glass bottle when the player just drank the potion.Check the fishing rod when you put away the fishing line.The grammar of the /Clear command contains another parameter behind the name of the item, which is the durability of the item:
/Clear << i> Players > Fishing_Rod_ROD {damage: 2} Please note that if you catch the ground or creature, the fishing rod may lose no less than 2 points.Durability, so a test of durability every 2 points.

National Service DNF Dark Ni
2025-01-28 09:19:27
The new screenshot of the be
2025-01-28 09:18:57
The 15th anniversary wallpap
2025-01-28 09:18:27
3DM Xuanyuan Sinicization Gr
2025-01-28 09:17:57
French magazine is the first
2025-01-28 09:17:27
The sneak game "Republic" wi
2025-01-28 09:16:57
The story between humans and
2025-01-28 09:16:27
Capture "Trinity 3: Artifact
2025-01-28 09:15:27
Wind direction change "Myste
2025-01-28 09:14:57
DICE's new project "Dream" w
2025-01-28 09:14:27
Pirate Minecraft Skins
Minecraft Skins
2024-12-10 04:11:27
Pirate Minecraft Skins
Minecraft Skins
2024-12-10 04:11:26
Master Minecraft Skins
Minecraft Skins
2024-12-10 04:11:25
King Minecraft Skins
Minecraft Skins
2024-12-10 04:11:25
Guide Minecraft Skins
Minecraft Skins
2024-12-10 04:11:24
Dark Knight Minecraft Skins
Minecraft Skins
2024-12-10 04:11:23
Sparta Minecraft Skins
Minecraft Skins
2024-12-10 04:11:23
Moncraft Skins of the War
Minecraft Skins
2024-12-10 04:11:22
Red Witch Minecraft Skins
Minecraft Skins
2024-12-10 04:11:22
Golden Cavaliers Minecraft S
Minecraft Skins
2024-12-10 04:11:22