2024-12-10 17:46:25|Myriagame |source:minecraft skins
This tutorial is set by the author's setting without permission.
Foreword
Initially I added LightMans Currency (hereinafter referred to as LC) to allow my own self -organized integration package to achieve a system store with similar mechanical power packages and armal series of currencies, so that they can achieve single -machine players or a few players when they open black connectors and players and players and players and players and players and players and players and players and players and players and players and players and players and players and players and players and players and players and players and players and players and players and players and players.Trade between systems (preferably automated!), Such as selling their own crops or killing monsters to make money, and use the money they earned to buy some difficult resources or non -renewable resources from the system.However, after downloading the module, I found that LC only added a shell with various mechanisms and items (although this shell is extremely powerful and excellent), and due to the limited heat of the module, the Chinese community temporarily lacks the tutorial of this aspect.After my personal long -term exploration, flipping the module GitHub Wiki, and a brief communication with the original author of the module in the Curseforge, a systematic nanny -level tutorial on using LC to build a system store.
Reminder before watching:
① Limited to the length and the author's own understanding of the module, this tutorial will not discuss the construction method of players trading stores or large server economic systems for the time being.
② The tutorial content is based on 1.18.2 forge, and the module version is 2.1.2.2.If the content of the module is inconsistent with the reality, please point out in the comment area!
Preparation
[If you already have a certain integrated package/module development experience, you can skip this part]
About text editor
Before starting all jobs, it is recommended that you prepare a suitable text editor.It is not impossible to use notepads, but it may make you more effort.Your time is very valuable
The author recommends the use of VS CODE, lightweight, easy to learn, powerful, and strong, which can fully meet the needs of this tutorial.You can also choose other text editors according to personal preference.
About configuration file
This tutorial includes the operation of some modified configuration files, so it is necessary to figure out the location of the LC configuration file and their respective content.The author will sort out a complete configuration file in detail and publish related tutorials.This tutorial only discusses modifying projects related to system stores.
The configuration files are located in the game version of the root directory (.mineCraft/Versions/game version name). If you do not have a version isolation, they will be located in the .minecraft folder.
① Basic configuration files: /config/lightManscurrency- Common.toml
Including content: disable specific equipment synthesis, villagers' transaction modification, monster drop, and box torrential modification.
② Client configuration file: /config/lightManScurrency-client.toml
Including content: UI, animation and sound adjustment.
③ The default server configuration file: /DefaultConfigs/lightManscurrency- Server.toml
Including content: coin mechanism, wallet mechanism, "money repair" enchanting adjustment, etc.
The default server configuration file will be applied to the archive when creating a new archive.
Ware
Including content: same ③.
The configuration adjustment of a single archive can be performed here, which does not affect other archives and global configuration.
⑤TM configuration file: /config/lightManscurrency/atmdata.json
Including content: ATM interface adjustment.
⑥ Frequent file configuration file: /config/lightManscurrency/custom_banker_trades.json
Including content: the default trading list of the villagers "bankers" added by LC MOD.
⑦ Castor transaction configuration file: /config/lightManscurrency/cashier_trades.json
Including content: the default trading list of the villagers "cashier" added by LC MOD.
⑧ Coin value configuration file: /config/lightManscurrency/masterCoInlist.json
Including content: the value of the superior relationships of various materials and currency, the exchange rate of mutual exchange rates, and the value of coins/coins.
文 Permanent transaction configuration file: /config/lightManscurrency/persistenttraders.json
Including content: The last part of this tutorial will be detailed.
LC coin and economic mechanism brief description
Coin and its acquisition
LC's coins are divided into 6 materials: copper, iron, gold, emerald, diamonds, and lower alloys. The default exchange rate is 1:10 between each level.The coins can be obtained through various transactions, coins, killing monsters drop and box loot, and most of the acquisition methods can be modified through configuration files.coin
Using a coin machine, every 1 corresponding metal ingot/gem can be cast with a coin with a corresponding material; the coin can also be melted into the corresponding material.
Configuration file: server configuration file
Configurable items:
CanMintcoins = True/False can cast coins
Canmeltcoins = true/false can it melt the coin
Canmint (MELT) Copper (Iron, GOLD ......) = True/False Can it cast/melt a specific material coin
The author of the tutorial recommends that the coin/melting coin mechanism is disabled or the casting of only low -level coins. The coin -issuance right should be in the hands of the system store; allowing players to cast high -end coins/melting low -level coins may cause unpredictable balance collapse.At the same time, it is recommended that Kubejs, CRT, etc. disable the coinning table of coin machines to prevent players from mistakenly synthesize a useless machine.
Monster drop
Killing monsters have a chance to drop the coins, the more advanced monsters can drop higher -level coins.
Configuration file: Basic configuration file
Configurable items:
EnablentityDrops = True/False Monster can drop the coin
ENableSpawarentityDrops = True/False brushed monsters.
AllowFakeplayrtrigger = True/False non -player attacking the monster can drop the coin (such as mechanical power robotics)
EntityListt1 (2,3,4,5,6) = [physical ID] Monster lists of various levels, killing ordinary monsters in the table can get a small amount of coins corresponding to and below
BossetityListt1 (2,3,4,5,6) = [physical ID] each level of boss monsters list, kill the boss monsters in the table to get a large number of coins from the corresponding and below
Box torrential product
Opening the dungeon, shipwreck, and lower borders have a chance to open coins.
Configuration file: Basic configuration file
Configurable project:
EnablecheStloot = True/False Treasure Box can coin
CheStlistt1 (2,3,4,5,6) = [Battlefield ID] The corresponding level of currency will appear in the corresponding torrential tables. Adding "Minecraft: Chests/Jungle_temple" to Chestlistt3 can make the Temple of Jungle Temple.Gold coins can be issued in the treasure chest
Villagers trading
The villagers' general currency can be replaced from emerald to LC's coins.
Configuration file: Basic configuration file
Configurable items:
Changevanillatrades = True to change the trading currency of the original villagers, excluding stray merchants
CHANGEMODEDEDTRADES = TRUE change the trading currency of the villagers added by the MOD, such as chef villagers added by Chef's Delight
CHANGEWANDERINGTRADES = TRUE change the trading currency of stray merchants
DefaultTradercoin = the item ID is used to replace the currency of the emerald, such as "LightManscurrency: Coin_EMERALD" represents the LC's emerald currency replaced the original villagers' emerald trading
Example: Use gold coins to replace the fisherman transaction after the default currency
Traderoverrides = ["Villager ID-Monetary ID"] For villagers of specific occupations, another currency is used to replace emeralds. The villagers and items need to be connected with "-"; if you add "Minecraft: Minecraft:Butcher-LightManscurrency: Coin_gold "representative: For the butcher, the use of gold coins instead of the default currency set in the previous configuration to replace the emerald (P.S. Change the default currency may cause unexpected difficulties to acquisition.There are other synthetic tables that need to be used, such as the capacity upgrade of the drawer of the storage drawer (V). It is recommended to add other ways to get the emerald at the same time.
Storage and use of coins
The coins can be stored in the player's backpack or different levels of wallets (on the premise of installing Curios, the wallet can be equipped with the player's jewelry bar), or it can be stored in the player or team's bank account.The bank account can be accessed through ATM. ATM can not only store the player's coins unlimitedly, but also exchange each other between different materials currency.
Coins can be used in trading; coins that are stored in the player's wallet can also be used when the transaction system comes with its own trading system (some devices can also directly use the coin in the player's ATM account);The corresponding coins must be placed in the backpack first.
System store
At the end of the preparation phase, we will enter the topic.The author recommends establishing a separate model of creative models to build various operations and subsequent modifications and management of system stores.
Use the sales machine to establish a transaction
First of all, you must enter the LC module administrator mode, which can be implemented through a instruction:/lcadmin toggleadmin.After entering success, the chat bar will pop up the news of "LC Management Mode: Enable".Enter this instruction again to leave the administrator mode.
Next, place any vending machine on the ground, such as large vending machines.(It is not recommended to use the armor sales machine, such as armor display cupboards, etc.)
Right -click the sales machine and turn on the transaction storage interface (the box icon button in the lower left corner):
You can edit the transaction you want to add.Click any transaction option to enter the transaction editing interface:
Click on the left side of the arrow to adjust the price.Press Shift and click the increase or decrease arrow button to increase or decrease the price of 5 corresponding coins at one time. Press CTRL to increase or decrease by 10 at a time.(The same operation can also be used in other interfaces involved in the increase or decrease of coins)
Click on the right side of the arrow with the corresponding items to place the items of transactions. The number of items needs to be divided in the backpack in advance.Each transaction supports two items at the same time.
The name box can change the display name of the transaction, but it will not change the name of the product in the hands.
There are three types of transaction types: sale, exchange (with objects), and purchase (acquisition).
Click the icon button in the upper right corner to change the trading rules of the product, such as adding discounts, free samples, price fluctuations, and number of purchases.For example, when you sell a powerful God Ho to the player, given the balanced consideration, you can set the number of purchase restrictions to 1, so that each player can buy a maximum of 1 God Ho.
Convert ordinary transactions into system transactions (permanent transaction)
As shown in the figure, we have established a transaction to buy the last shadow pearl and an acquisition of wheat.However, at this time the transaction interface may display "no inventory" and "unable to afford", because the two transactions at this time are still default players' transactions, and players need to fill the inventory to operate normally, and they can only be in this world of this world.Motor on the trading machine.
Back to the trading storage interface, click the fourth gear icon button from top to bottom from the left to enter the transaction settings interface:
Red Frame: The name of the transaction group contains all the settings of the settings in the vending machine.After entering the name, you need to click the "Rename" key to complete the name of the transaction group.
Yellow Frame: The name of the owner displayed in the transaction group.You can also change it to a more immersive name, such as the owner of the trading team selling agricultural products to "a certain village".
Blue box: ID of this transaction group.If you leave empty, the system will randomly generate a string of IDs.The author is very recommended to develop a good habit of setting labels to facilitate the management after the increase in later transactions, and transaction editing through the method of text editors outside the game.
Gray frame: ("C") Set the transaction group as a transaction, that is, the transaction with unlimited inventory.This item must be opened in the form of a system store in the form of a system store.The "+" and "-" button on the left can increase or reduce the maximum number of transactions of the sales machine in this station to support the addition of more than 12 transactions.
Green box: ("P") store the transaction group as permanent transaction, that is, the transaction in the system store we described above.After clicking this button, the chat box will pop up "Common transactions with ID to XX", which means that it is successful.
(The P.S. module itself is inconsistent with the Chineseization of "Persistent Trade"; the "permanent transaction" and "general transaction" described above and the "system store form transactions" and similar statements used by the authors to facilitate the understanding of your understanding refers to the same statement.The same thing; if the confusion in understanding is caused, please readers forgive me!) The use of the system store
The author is very recommended to integrate package developers to use tools such as FTBQUESTS to guide players how to use system stores.
Transaction terminal
For module players, trading terminals can be used to trade with system stores.Place a transaction terminal and right -click:
As shown in the figure, the "Example Transaction 1" we have created before has appeared in the trading list. This list is open to all players. Players can conduct the transactions we have set up before with the system store here.
The "auction house" item at the top of P.S. is displayed by default (in your Chinese version, which may be displayed as a "farming trading center" farming pear Sand:?), The author has not found out how to remove this item for the time being, but fortunately it is harmless.
Automatic transaction
For some transactions that need to be continuously performed/large in quantity (such as the agricultural product acquisition trading machine connected to an automated farm), players can use the commodity transaction interface terminal for automated transactions.Open the terminal of the product transaction interface, and click the button of the third trading terminal icon above the above.
After that, select the button of the fourth gold coin/iron coin trading icon "Select the transaction" and select the transaction you want to do.
The commodity transaction interface terminal can directly use the coins in the player's ATM account and the items in the machine inventory of the player to trade, and will display the player account balance in the state interface:
The button of the second box icon can open the inventory of the machine and can configure which side of the items and coins input/output.The inventory of the machine can only put the corresponding items when choosing an acquisition and exchange transaction, and cannot be put in the coin.
The upper right corner is displayed as a prohibited icon button to adjust the machine whether the machine is affected by the redstone signal or frequent/frequently open.The buttons displayed as a pairing hook icon can be adjusted when the player (the player of the machine and the account owner displayed by the state interface) is only traded or traded anyway.
Meet all working conditions and when the player account balance is sufficient (for the acquisition/exchange transaction, it is when the machine inventory has sufficient corresponding items).The items are output through the output surface of the configuration (a block that can be transmitted by active items for the output surface can be transmitted).
Trading in the game outside the game
All the transactions added in the game before are stored in the "game version root directory /config/lightManscurrency/persistenttraders.json".
For example, the format of the "Example Transaction 1" we created before is in the JSON file is like this:
{{
"Traders": [[
{{
"Type": "LightManscurrency: Item_trader",, "
"ID": "example_trade_1",
"Name": "Example Transaction 1",
"OwnerName": "System Store",
"Trades": [[
{{
"Tradetype": "Sale", "Sellitem": {
"ID": "Minecraft: Ender_pearl",
"Count": 5
},
"Price": {{
"Value": [[
{{
"Coin": "LightManscurrency: Coin_EMERALD",
"Amount": 1
},
{{
"Coin": "LightManscurrency: Coin_Gold",
"Amount": 5
}
]
}
},
{{
"Tradetype": "Purchase", "Sellitem": {
"ID": "Minecraft: WHEAT",
"Count": 50
},
"Price": {{
"Value": [[
{{
"Coin": "LightManscurrency: Coin_Iron",
"Amount": 2
},
{{
"Coin": "LightManscurrency: Coin_Copper",
"Amount": 2
}
]
}
}
]
}
],,,
"Auctions": []}
For each line representing the file, you can learn simply observation, and the author will not repeat it.This method can be more convenient and free to add new permanent transactions, and edit and manage existing permanent transactions.
This tutorial is over here. I hope that readers can successfully create a good system store!

National Service DNF Dark Ni
2025-01-28 09:19:27
The new screenshot of the be
2025-01-28 09:18:57
The 15th anniversary wallpap
2025-01-28 09:18:27
3DM Xuanyuan Sinicization Gr
2025-01-28 09:17:57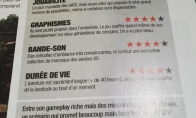
French magazine is the first
2025-01-28 09:17:27
The sneak game "Republic" wi
2025-01-28 09:16:57
The story between humans and
2025-01-28 09:16:27
Capture "Trinity 3: Artifact
2025-01-28 09:15:27
Wind direction change "Myste
2025-01-28 09:14:57
DICE's new project "Dream" w
2025-01-28 09:14:27
Pirate Minecraft Skins
Minecraft Skins
2024-12-10 04:11:27
Pirate Minecraft Skins
Minecraft Skins
2024-12-10 04:11:26
Master Minecraft Skins
Minecraft Skins
2024-12-10 04:11:25
King Minecraft Skins
Minecraft Skins
2024-12-10 04:11:25
Guide Minecraft Skins
Minecraft Skins
2024-12-10 04:11:24
Dark Knight Minecraft Skins
Minecraft Skins
2024-12-10 04:11:23
Sparta Minecraft Skins
Minecraft Skins
2024-12-10 04:11:23
Moncraft Skins of the War
Minecraft Skins
2024-12-10 04:11:22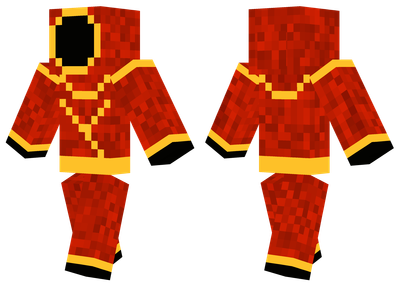
Red Witch Minecraft Skins
Minecraft Skins
2024-12-10 04:11:22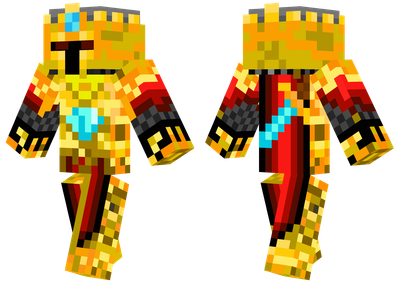
Golden Cavaliers Minecraft S
Minecraft Skins
2024-12-10 04:11:22