2024-12-10 17:55:55|Myriagame |source:minecraft skins
This tutorial is set by the author's setting without permission.
Before starting, you need to prepare these tools
From left to right, they are: beautiful workers, dyeing pigments, palettes, paint guns, and chisels
Then, right -click the core of your mecha with the palette
Then this panel will appear
Here, you can adjust your mecha pre -selection color. Remember, it is the pre -selected color of the mech
In other words, the color that you adjust in this mech can only be used in this mech
For example, my color is tone like this
Then click to save
After that, use staining pigments and right -click the square in the mech
You will find that the square becomes like this and is divided into 4 small grids
This proves that the color and carving can be carved. Now I will first come to the color
Take out the paint gun and right -click on the square, you can get a small grid color
So, the color of the color of the paint gun is to squat in the air+right -click
The number of your spray gun will change
The No. 4 of this lacquer gun just corresponds to the 4th here No. 4
Then right -click and spray paint so that you can spray yellow
Let's talk about carving next
You need to prepare: chisel, beautiful worker knife.Chromosome
The use of dyeing pigments here is that it can be carved more detailed. The staining pigments are right to right -click on a small square that is divided into 4 grids.Right -click again, and turn back to the prototype
The use of chisels: After using dyeing pigments, facing those small squares
Left button: knock off a small block
Right -click: generate a small block
If all the small blocks in a block are removed, it will automatically restore
The purpose of a beautiful worker:
There are many modes of the U.S. Gong knife. Squat+right -click to switch the mode. In my case, I am
The first: default mode
Left button in the small square, you can generate a 45 -degree slope
Then left button to generate a small triangle
Leave the left button, just recover
Second mode: angle fine -tuning mode
This model is used when using the first model to create a slope, which is used to adjust the slope
Facing the slope left button, the slope will become lower, so that it is no longer 45 degrees
Right -click on the slope, the slope becomes 45 degrees again
Right -click, the slope becomes a bit steady
The third mode: rotating mode, similar to the rotating wrench, but the rotating wrench rotating is a whole square, and the knife is rotating a small square
Right -click on the small square is a horizontal rotation
The left button is vertically rotating
The fourth mode: the flip mode, the role is similar to the third mode above
Right -click the horizontal flip, the left button flip vertically, 180 degrees
Fifth mode: Copy mode
This mode is to copy the shape of the small block. Right -click on a small square, save the shape into the tool, and then left the other small block to the left to paste
Right -click to save
Left -button paste

National Service DNF Dark Ni
2025-01-28 09:19:27
The new screenshot of the be
2025-01-28 09:18:57
The 15th anniversary wallpap
2025-01-28 09:18:27
3DM Xuanyuan Sinicization Gr
2025-01-28 09:17:57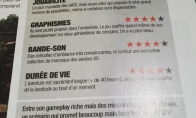
French magazine is the first
2025-01-28 09:17:27
The sneak game "Republic" wi
2025-01-28 09:16:57
The story between humans and
2025-01-28 09:16:27
Capture "Trinity 3: Artifact
2025-01-28 09:15:27
Wind direction change "Myste
2025-01-28 09:14:57
DICE's new project "Dream" w
2025-01-28 09:14:27
Pirate Minecraft Skins
Minecraft Skins
2024-12-10 04:11:27
Pirate Minecraft Skins
Minecraft Skins
2024-12-10 04:11:26
Master Minecraft Skins
Minecraft Skins
2024-12-10 04:11:25
King Minecraft Skins
Minecraft Skins
2024-12-10 04:11:25
Guide Minecraft Skins
Minecraft Skins
2024-12-10 04:11:24
Dark Knight Minecraft Skins
Minecraft Skins
2024-12-10 04:11:23
Sparta Minecraft Skins
Minecraft Skins
2024-12-10 04:11:23
Moncraft Skins of the War
Minecraft Skins
2024-12-10 04:11:22
Red Witch Minecraft Skins
Minecraft Skins
2024-12-10 04:11:22
Golden Cavaliers Minecraft S
Minecraft Skins
2024-12-10 04:11:22