2024-12-10 17:58:15|Myriagame |source:minecraft skins
This tutorial is set by the author to use the CC By-NC-SA protocol.
Observation prompt:
This tutorial is based on the 1.20.1 version of FTB tasks (not added other modules) to achieve customized image functions.
The FTBQ of version 1.16-1.19 has not been tested, but according to the principle, high degree of line can be tested by itself.
PS: In fact, another long article in the station has introduced two methods. This tutorial is mainly to expand a method that does not require Kubejs and production resource packages.
[Text] In the 1.16+ version FTBQUESTS, do not add other modules to add custom pictures
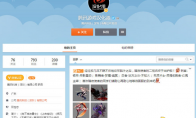
First of all, if you click to check the tutorial, you should have tried to add pictures.
But waiting for your interface must be like this:
Can't you put pictures for a configuration folder? Is it a new operation from the material in the module?IntersectionIntersection
If we want to add custom pictures, follow the next steps.
Exit the game, find the MODS folder in the game directory, and open the .jar file of FTBQ.(You can use winrar)
Enter assets/ftbquests/textures and add a new folder.(I named "Piction", do not use Chinese and special characters to avoid excessive modification of the module file)
3. Put pictures that need to be imported into the newly -built folder.(Do not use special characters and Chinese. It is recommended to name it directly by the serial number, such as 001, 002 丨 only pictures of PNG format!)
4. Confirm that the picture has been saved in the .jar file, exit the compressed file and open the game.
After entering the game, right -click the picture on the task interface and search for the name of the picture just now.(Note: FTBQ needs to restart the game to load the custom picture)
Click to add to the task interface.
[Extraction] The picture function is slightly solved
Generally, we only use the adjustment position to the high width ratio.
The height of the pictures added by default is 1, and only the value of the equal proportion is required.(For example, I am 3.92: 1 here, so that it can expand it three times that only need to fill in 3.92 and 1 at the same time to fill in the corresponding position at the same time)
The movement of the picture is also quite simple,
The easiest way is to click the middle key for the picture. At this time, the picture will enter the state to be mobilized (translucent and flashing),
Click the left button to place the picture to the desired position.
Author's words
This tutorial is a fast -moving product I studied 5 minutes.
This is my first tutorial. Some places do not do well, but I hope to help everyone.
Okay, I'm going to study the next feature!
National Service DNF Dark Ni
2025-01-28 09:19:27
The new screenshot of the be
2025-01-28 09:18:57
The 15th anniversary wallpap
2025-01-28 09:18:27
3DM Xuanyuan Sinicization Gr
2025-01-28 09:17:57
French magazine is the first
2025-01-28 09:17:27
The sneak game "Republic" wi
2025-01-28 09:16:57
The story between humans and
2025-01-28 09:16:27
Capture "Trinity 3: Artifact
2025-01-28 09:15:27
Wind direction change "Myste
2025-01-28 09:14:57
DICE's new project "Dream" w
2025-01-28 09:14:27
Pirate Minecraft Skins
Minecraft Skins
2024-12-10 04:11:27
Pirate Minecraft Skins
Minecraft Skins
2024-12-10 04:11:26
Master Minecraft Skins
Minecraft Skins
2024-12-10 04:11:25
King Minecraft Skins
Minecraft Skins
2024-12-10 04:11:25
Guide Minecraft Skins
Minecraft Skins
2024-12-10 04:11:24
Dark Knight Minecraft Skins
Minecraft Skins
2024-12-10 04:11:23
Sparta Minecraft Skins
Minecraft Skins
2024-12-10 04:11:23
Moncraft Skins of the War
Minecraft Skins
2024-12-10 04:11:22
Red Witch Minecraft Skins
Minecraft Skins
2024-12-10 04:11:22
Golden Cavaliers Minecraft S
Minecraft Skins
2024-12-10 04:11:22